 |
||||
|
|
||||
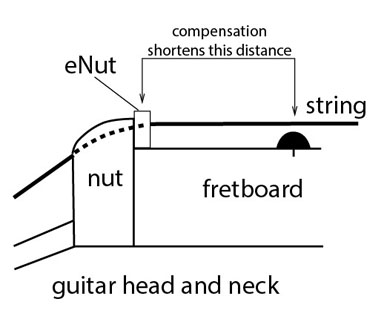
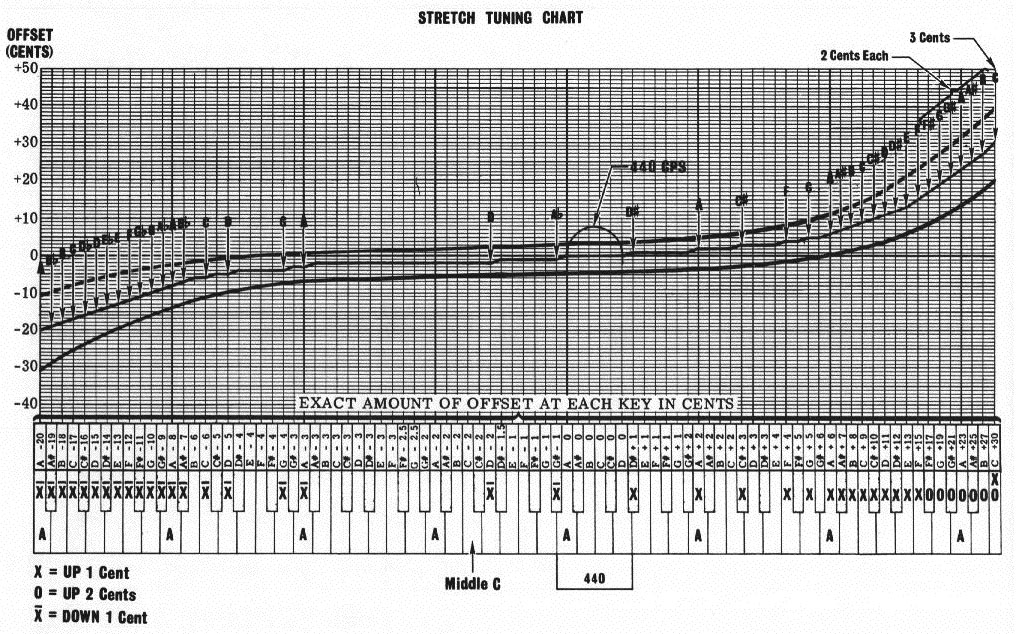
ON THIS PAGE The Guitar and Its Imperfections eNut—My Answer to Better Guitar Intonation Setting Guitar Intonation and Saddle Octaves the Correct Way The Correct Way to Wrap Strings Around Tuning Posts Neck Relief, Nut, Frets and String Action Other Setup Tips and General Guitar Info Other Intonation Tips The Guitar and Its Imperfections Being born with near perfect pitch perception has been both a blessing and a curse. A curse in that the imperfections of guitar intonation have driven me crazy for years. A blessing because it has driven me to try and solve those guitar intonation problems. Nothing drives me nuts more than an instrument that is off-pitch with other instruments or with itself. The only genre I find off-pitch instruments tolerable is early vintage Blues. Some of the unique appeal of early Blues is in the off-pitch style of its players. In my opinion the music just wouldn’t sound as believable if it were on pitch. There’s just something about early Blues music that grabs me deep in my being. The honesty and soulful playing of the player is more important to me than whether or not they are in tune. But this is where I draw the line. Orchestra, Jazz, Rock, Gospel, Modern Blues, R&B, etc. all sound terrible to me when instruments or singers are off pitch. Having said that, there are certain recording techniques that some artists use that vary the pitch on recorded tracks to obtain a unique vibe. Here’s how it’s done. The player will take one guitar track and with a tuner that is accurate enough to tune in cents (100th of a semitone) and tune the guitar (10 cents) or more flat. That player will then record a track and pan it hard left. The player will then tune that same guitar (10 or more cents) sharp and play the same passage and pan it hard right. This technique is not only used with guitar but with other instruments as well. When used properly this technique gives the music a certain tension that helps to draw the attention of the listener. Intentional off-pitch flattening or sharpening have their place, but instruments that are out of tune with themselves are not pleasant to listen to. I have an especially difficult time with some horn players. Unless a horn player possesses a keen sense of pitch, the instrument cannot be properly tuned. The very nature of the instrument demands that the player have exceptional pitch perception. Few things make me cringe more than musicians with instruments that are off pitch. So how do we, as guitarists, deal with this issue? It depends on who you choose to believe as to how you approach the problem. I certainly have my opinions, as do many others. Who, you may ask, has the answers to this age-old problem? I suggest you draw your own conclusions. I can only offer opinions and solutions that I have found work for me. But the real proof, as they say, is in the pudding. This often leads to "tweaking" of the tuning in real performances, away from equal temperament. It also leads many other music traditions to prefer tunings other than equal temperament, particularly tunings in which some of the intervals are physically perfectly in tune. These imperfections of equal temperament are part of what cause intonation issues on guitar. I say part, because it’s only one of several issues we must address if we are to improve guitar intonation. On piano the dissonance or imperfections caused by equal temperament are addressed by doing what piano tuners call “Stretch Tuning” the piano strings. I know there are skeptics—I was once one myself. When a certain tuning system came out several years back I believed it to be nothing more than a gimmick. While I still believe the system is way over-priced, I am no longer skeptical. Nut compensation works—as do incorporating slight pitch adjustments when tuning (eNut Tuning Offsets). I just don’t feel charging exorbitant prices for a system is fair to the average or pro player. And that is the reason I invented the eNut. It’s inexpensive enough for the average player to afford and effective enough to satisfy those that could pay more but just choose not to. At $20 for a Bone, Brass or Silver eNut, with installation tools and Tuning Offsets included, is a no-brainer for anyone that wants an inexpensive way to improve their intonation.
|
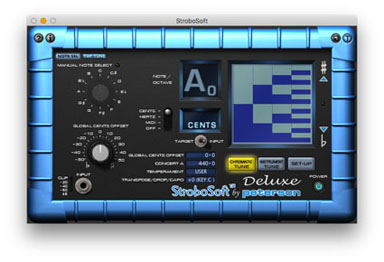
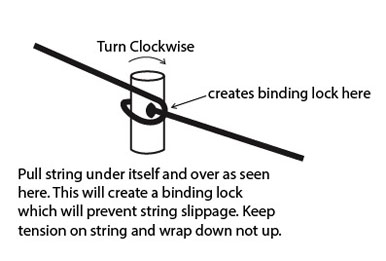
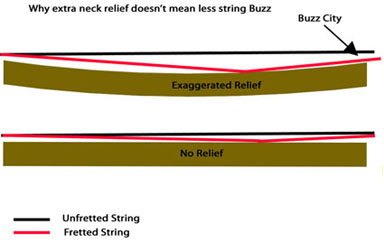
Setting Guitar Intonation and Saddle Octaves the Correct Way For years I set my intonation by striking an open string and then adjusting the saddle at the 12th fret octave to match that same note. That is, until I ran across an article by Stephen Delft. Do yourself a favor and do a search on Google for articles written by Stephen Delft. You’ll find Stephen’s articles informative and insightful. Stephen deserves a lot of credit for the groundwork he has laid in regard to guitar intonation. Stephen, in one of his articles, suggested using the 2nd and 14th frets when setting the octaves. I tried Stephen’s method and immediately became hooked. When you think about it, it just makes sense to set the string octaves this way. First and foremost, once any type of nut compensation (repositioning of the nut to first fret) is performed, the distance from the nut to the 12th fret is altered. So setting the octaves at 0 and 12, after nut compensation, is not advisable. In fact, even without nut compensation I recommend setting the octaves at 2 and 14. You just get a truer octave when using 2 and 14 because with the 2 and 14 method you are fretting both notes. With 0 and 12 you are fretting one and not the other. A fretted note will always be minutely sharper, pitch-wise, than an open note. Okay, I know I’m a little anal about this, but believe me this stuff works. Just make sure when setting the octave at 2 and 14 that you apply the same amount of pressure when fretting the notes. Setting your octaves at 2 and 14 will require a note sensing and very accurate tuner. I highly recommend one of the Peterson VS Series tuners or their newer and less expensive Strobestomp. The Peterson V-SAM and the Peterson Strobestomp will let you program custom tuning offsets into them such as my ‘eNut Tuning Offsets’. These tuners are accurate to within 1/10th of a cent. If you are serious about intonation, an investment in one of these tuners is well worth the cost. At the time of the writing of this newsletter (2017) the Strobestomp was selling for under $200 USD. I’ve also seen used Peterson VSI, VSII and V-SAM sell for well under $200 on eBay. Peterson has also just released a software version of their Virtual Strobe Tuner called StroboSoft that is available for your iPhone or Android for $9.99.or as a plug-in for your DAW for Macintosh and Windows operating systems. The StroboSoft plugin app is very inexpensive at $109.00 Don’t scrimp on a tuner. Cheap quartz tuners have an accuracy of plus or minus 3 to 5 cents. That’s a fudge factor of 6 to 10 cents! Nowhere near accurate enough to apply custom tuning offsets or regular tuning pitches for that mater. No one serious about tuning should be without an accurate tuner. It’s an essential part of a guitarist’s arsenal. I’ve seen players that will spend $2500 to $5000 for a guitar and then tune it with a $25 quartz tuner. This is just plain nonsense. If you are a serious player that is serious about your instrument then an accurate tuner should be part of your guitar rig. Once a binding tight lock has been created start winding the string around the post. Be careful to wind the string around the post so that it wraps down and not up. By winding the string down you are creating more angle tension as the string travels over the nut. While winding the string make sure you keep pressure and tension on the string with your right hand. This will keep string stretch to a minimum at the post. Make sure and trim all string excess off. There is nothing worse that poking yourself or someone else in the eye or face with string excess hanging from the headstock. Once you have trimmed all string excess go ahead and tune to all strings to pitch. Once all strings are at pitch you want to stretch each individual string. Do this buy grabbing the string at about the 12th fret and firmly pull the string up. Be careful not to over-stretch your strings or pull excessively on the strings. Over-stretch can actually negatively affect the tone of a string. Stretch only enough so that the string stays on pitch when tuned. Once the string has settled down and stays on pitch after chokes and pulls, you know you have successfully eliminated the slack of each string. Remember, stretching is very important, especially when replacing strings for a live gig. There’s nothing worse than going out of tune during the first set of a gig. For the smaller E, B and G plain string slots I use the X-Acto Serrated Saw Blade. For the other string slots I use the Nut Slotting Tool (Torch Tip Cleaner). Simply use these tools to shape the slots and eliminate any binding. The key is to be patient and file only a little at a time until the strings no longer bind. Next, let’s address nut slots that are not cut deep enough. A guitar nut that has its slots cut too high will cause notes at the first few frets to play sharp and make chording difficult. A good rule of thumb is the distance from the bottom of the string to the top of the first fret should be only slightly more than the distance from the bottom of the string to the top of the second fret when fretted at the first fret. Be careful though—if you cut your slots too deep your open strings will buzz because they are hitting the first fret. If you accidentally cut the slots too deep, take some Super Glue and put a drop into the slot. Let it dry and then simply recut and shape the slot. I’m frequently asked how I set my action on my guitars. As a younger player I liked my action low—probably less than a sixteenth of an inch from the bottom of my strings to the top of the 12th fret. As I’ve gotten older I’ve discovered raising my action made my notes and chords ring truer with more clarity. I now set my action on my electrics to 3/32” at the 12th fret. On my acoustics I’ll raise that to 1/8”. On my bass guitar I will set it to 3/16” at the 12th fret. I use Elixir 9-42 on my electrics and the Elixir light acoustic gauge set for my Taylor. I know, Elixirs are expensive, but I find they last 4 to 5 times longer than conventional strings and I love the way they feel. TIP: Always wash you hands before and after playing. I use Formby’s lemon oil but some feel it can be harmful to the guitar’s finish. A lint-free clothe with lubricant works great. By wiping the strings down you increase string life tremendously. If you have a hard time finding the correct wrench, simply call a local music store—they usually keep a good supply on hand. If your local store doesn’t have it, get on the Internet and find the manufacturer’s phone number and give them a call. Most manufacturers will send one out for free or at least for a small fee. When setting neck relief I don’t use a measuring device. Some will tell you to place a capo on the first fret and then fret the very last fret at the neck pocket and using a feeler gauge measure. I guess this is the scientific way, but that is not the way I do it. I guess I’m not very scientific, huh? I simply hold the guitar up to a light source a look straight down the neck from the bridge end of the guitar. I then adjust the truss rod until there’s a very slight bow in the neck. I’ll then play the guitar, making adjustments along the way until it feels right. That’s it, not complicated at all. Let’s talk about frets. Over time all frets will develop small divots or crevices in them. This happens more frequent on the frets near the nut that the frets near the bridge. A simple fret level and polish will take care of this. I’m not going to suggest you do your own fretwork. This is probably best left to someone with experience. Find a good Luthier. If you want to try and do you own fretwork there’s plenty of info on the Internet. I do my own fretwork, but it’s taken me years to get good at it and I don’t suggest you play guinea pig on your most prized guitar. Pay someone else with experience—you’ll be glad you did. If you must try your hand at it—go and buy an old beater or inexpensive guitar to practice on. A properly leveled and polished fretboard is essential for attaining a properly intonated guitar. Frets that are too flat or improperly shaped can cause an instrument to fret off pitch. When the fretting point is not the center of the fret, which is the case with an improperly leveled and shaped fret, your notes will not be dead-on pitch. It’s amazing just how many improperly setup guitars I’ve seen over the years. When a guitar is properly setup where the action, nut, neck relief and frets are setup the way they should be, that instrument will be a pleasure to play and will exhibit the ultimate in guitar playability and intonation. While no guitar is perfect, there is a certain level of perfection that is attainable. Why settle for anything less that this? A properly setup guitar is a pleasure to play and is much more inspiring. ----- | TOP OF PAGE | -----
|
Monte Allums eNut Tuning System Explained Other Setup Tips and General Guitar Info Protect your instrument. Purchase high quality strap locks and a good strap. I don’t know how many times I’ve seen players drop an instrument because they didn’t invested in a quality strap and strap locks. Don’t scrimp here. I also suggest a soft pliable leather strap. One that won’t slip while on your shoulder. Nothing more aggravating than a guitar that is neck heavy and keeps slipping while you have it strapped on. Take your guitar with you to a music store and try several until you find one that is comfortable and doesn’t slip. Pick up a good set of strap locks while you are there. I’ve owned a few Gibson guitars over the years. I currently own an SG and a Les Paul. Both of these guitars have the stationary tune-o-matic bridges. If you mute your strings a lot the low E saddles on these bridges can dig into the palm of your hand, and for an aggressive player this can be painful. I remedy this by taking a Dremel tool and filing the edge of the saddle down so it is smooth. This makes for a much more comfortable playing experience on guitars that have this type of bridge. One of the first things I do after a new guitar purchase is polish the frets. This is very easy to do and the benefits are well worth the time. First, remove the old strings. You’ll need a Dremel tool, fretboard protector. The fretboard protector can be purchased here. Place the protector over each fret and polish each fret until it is smooth and shiny. The polishing wheels I recommend using can be purchased here. After you have finished polishing, there will be residue left on the frets and fretboard. This residue can easily be removed with Windex or Lemon Oil. I like to spray the neck with Windex and let it soak a minute or so and then wipe as much of the residue off as possible. I then will take an old toothbrush and Formby’s Lemon Oil and remove the remaining residue with an old sock or soft cloth. To top off my fret polish I like to put a set of new Elixir strings on my guitars. Elixir strings are a little more expensive than regular strings but last four to five times longer. We all have a need to use a capo from time to time. And we all have experienced the tuning issues that capos can cause. There’s only one kind of capo I suggest using and it is pictured here. Other capos will work but I have found that this capo gives you the best tuning stability when used properly. The placement of the capo is critical for tuning stability. Always place the capo right at the fret and not too far behind the fret that it pulls the strings sharp. If you place the capo right at the fret just to the backside of the fret, your strings will stay on pitch. You may not realize it, but when you stand with a guitar that is strapped around your shoulder the tension on the neck and body is different than if you are sitting on a stool or chair. These subtle differences in tension will affect the pitch of each string also affecting tuning. Always tune your instrument in the same position that you will be playing. If you will be standing while playing, tune your instrument while standing. If you will be sitting while playing, tune your instrument while sitting. This may seem trivial but it does affect intonation. Remember, it only takes a few cents flat or sharp to affect your instruments intonation. Little things such as this may seem small, but the small things add up. That’s why it is so important to address all of them. Once you have all the bases covered you can then start enjoying the benefits of a well-tuned instrument. Playing technique plays a huge role in guitar intonation. The way in which you fret chords and notes has a direct affect on whether the chords are on pitch or off pitch. The amount of pressure used when fretting can cause notes to go sharp. It’s important to develop accurate and proper playing technique. When fretting, apply only enough pressure required to make the notes ring true without buzzing. Too much finger and hand pressure will make fretted notes go sharp. Pay special attention—try and accurately fret your notes so that you are not pushing or pulling them. Pulls and chokes are okay when playing single notes and have their place when deliberately trying to add vibrato on chorded passages—but when making regular chords pay close attention to your technique so that the notes you are making are on pitch. A properly setup guitar with an eNut is useless if the person playing the instrument has poor technical skills. If you are a beginner, learn these techniques early—bad habits are hard to break once you’ve been playing a while. Wash you hands before you play. Sweat, dirt, body oils and grime are your strings and guitars worse enemy. These elements get in between the wrappings on the wound strings and affect tone in a negative way by deadening the strings. Your body produces acidic chemicals (some more than others) that corrode the strings and other metals on a guitar. I’ve met a few players that had such acidic and corrosive body oils that it only takes one time playing an instrument and the strings are toast. Always wipe your instrument strings, neck and guitar parts down after you have finished playing. I keep a bottle of Formby’s Lemon Oil in my guitar case, along with a lint-free handkerchief to wipe my strings and neck down after playing. It’s well worth the time and effort and your strings will last much longer. Most of you already know this but I think it’s worth mentioning anyway. Don’t expose your instrument to extreme temperature changes. Always store your instrument in a temperature-controlled environment. Never leave your instrument in the trunk of a car in cold or hot weather. Doing so could damage the finish and/or warp the wood. It’s also not a good idea to place instruments in direct sunlight for any period of time. Take care of your instrument and it will give you a lifetime of enjoyment. Make sure the tuning keys are tight and not loose. I’ve gotten several guitars in for a setup where the tuning posts and keys where loose. This is very easy to fix with a screwdriver and a wrench. If your guitar has a set-neck, make sure you check the screws to see if they need tightening. Check all components that come in contact with the strings—bridge, bridge saddles, bridge post, Floyd Rose posts, etc. On acoustics make sure the bridge pins are secure and that the string ends are as close and tight up against the bridge pins as possible. |