Client Testimonials.....
Hi Monte, I just got the eNut in the mail today and installed it. It's a great idea that really works, thanks for making this available at a much more reasonable price than you-know-who, all of them... It's such a simple idea I don't know why it hasn't been done before. It really makes a wonderful difference! My new Korean Lite Ash Telecaster is a great guitar, and I thought I had it set up pretty well - fairly true at most positions, very sweet sounding. So I said what the hey, I'll try this even though I'm pretty happy with what I've got. But it works so dramatically, it's like a whole new guitar, playing truer and better than any guitar I've ever had! And that's just tuning with an old Korg GA20 that doesn't really do cents, and even just tuning by ear it still results in an amazing, wonderfully satisfying change with the strings really in tune for the first time! Your simpler system seems to me so much better than spending big bucks for the other systems, I'd bet the eNut gives 95% or more of the benefit of the more "sophisticated" and expensive systems out there that require much more work and changing the guitar parts permanently. I hope you sell a lot of them! It was really easy to install, I had to lower the strings at the nut only a tiny amount. I left the eNut plain, without any string grooves and it works just fine. Thanks again Monte!
Tim
Chandler
Memphis TN
Monte, I finally installed the eNut and it has given my Strat good-sounding first position chords for the first time! I was already using a good strobe tuner. First, I added your offsets - much better. Then, I installed the eNut. Fantastic! This is on an instrument which had been set up by a professional luthier, someone I trust to work on my best instruments. Installation was simple, as you said it would be. Just a bit of patience. The little set of slotting files REALLY helped a lot. Those are a fantastic bargain and work as well as expensive slotting files. I'm really wondering when Fender will get its act together and sell instruments which are properly shielded and intonated. Probably never. Regardless, I now have a quiet and properly intonated Strat that is everything I need. Thanks again!
Karl
Hoehn
Seattle, WA
no_spam_khoehn@comcast.net
Hi Monte, I would like to thank you for such a simple, yet effective, guitar improvement. I've installed it on my '81 B. C. Rich Mockingbird (24.75" scale) and just the eNut alone made one hell of a difference! I recently purchased a Boss TU-2 Tuner, and I don't plan to switch to a Peterson just yet. (I recently sold my Conn Stroboscope, just not portable enough!) Right now I've installed the eNut, intonated at the 2nd and 14th. A million thanks for all your efforts my friend, kudos.
Carl
Lasnier
Montreal, Canada
no_spam_xplanet@aei.ca
Monte, Your eNut (silver) saved me $230 on a Luthier repair and perfected the guitar's tuning! Thanks! Now I'm back for more! This time a bone eNut for another guitar.
no_spam_billcory@earthlink.net
Niche Publishing Co.
Colorado Springs, CO
Monte, this is a little late in coming, but I wanted to thank you for your innovation in a product like thisand your genuine kindness in our brief discussions. Your eNut resolved the sharp tuning of a favorite Tele of mine perfectly. It now not only sounds better, but stays in tune and is a pleasure to play. Thanks for all of your help, your ideas and kind words. Truly a great product.
Grant
Mader
Pleasant Hill, CA
No_spam_gmader@mail.esignal.com
Monte, just got the metal eNut installed, re-intonated and tuned. The intonation and tuning took longer than the "installation". :-) What a difference! I don't have perfect pitch by any means, but even I can hear how much more pleasant the chords sound. Wow. Great product! I'm hooked. Next is the bone eNut install and I've still got 5 more guitars that will need it. :-) If you ever do alternate tunings, I would be very interested in any offsets. I use open-G, dropped-D and double-dropped-D are used quite a bit, but whatever you come up with, I'd love to see.
Chris
Ecks
no_spam_ceckssprint@earthlink.net
Hey Monte, this thing is bloody great!! SO much better tuned AND sounding than the Earvana!!! And the tuning is VERY sweet mate! You wuz right, it is better than the Peterson "sweetened" tuning. And for only $16!!! Oh, that tool you sold me is KILLIN'! Thanx heaps mate!
Michael
Lawrence
no_spam_law.belowcanal@verizon.net
Hi T-Von, I've got my Peterson Strobostomp programmed with your offsets - my PRS sounds great with them, as does my Earvana nutted strat. Thanks!
Hayden
Minett
no_spam_H.Minett@leeds.ac.uk
Hi Monte, well, I picked up my guitar Tuesday night. I had given the tech at my local store your instructions to follow and the results are that visually it looks like something I might have done, certainly not as clean as in your illustration. However, he didn't charge me much and most importantly what a difference. With the addition of your Tuning Offsets the guitar is in tune everywhere! I think I have pretty sensitive ears and the guitar has never sounded this good. It is indeed a pleasure to play. You sir, are a genius! Many Thanks,
Frank
Balash
Bellmore, NY
no_spam_frank.balash@ssa.gov
Monte, so I tried your solution and at first I thought, "well, it'll be better than not having anything." I had tried various other methods of nut compensation (which companies I will not disclose) never being satisfied with the outcome. Now for the, "I strung it up and "wow!" Nope. I strung it up and "eh... better than without", but still not completely satisfied... UNTIL I grabbed my Peterson VSII tuner and for the first time used the off-set function using Monte's off-set suggestions. Now, I can say, "WOW!" I would spend so much time tuning and making sure that my fretted notes weren't sharp, compensating by making it a little flat open. This takes the guess work out of tuning and it also takes the second guessing out of my tuning as well. It literally cut my tuning time in half, if not more! Let me add, I have NEVER in my life wanted to rely on a tuner for tuning. BUT, if I've learned one thing about tuning it's this - you can tune all the open strings perfectly, but when fretted they'll be slightly out of tune. So I'd go back to retune to the chords making slight adjustments so my D, E, G, and A open chords were okay. I had to bring myself to the conclusion that for me, a tuner is not a device that replaces my ear, but one that meets the standard of my ear. Thanks again Monte for the eNut and ESPECIALLY for the off-sets!
Eddie
Choi
Chicago, Illinois
no_spam_eddiechoi@gmail.com
Hey Monte, got the Bone eNut on Saturday and installed it. I am very pleased. With the Floyd Locking Nut it is very easy to cut the string slots by using the V-shaped nut as a guide. In fact, for the low E and A I just folded the sandpaper and used its edge to cut the slots. I left them a little bit higher and the guitar plays great, but I may cut them to match the original nut after I play it a bit more. I tuned the guitar to pitch and did the intonation, then tuned to your offsets. Right now the guitar plays very nicely in tune. I strongly recommend this product to everyone I know in real life as well as in cyberspace. I am partners in a recording studio and am exposed to many guitarists. I will surely recommend the eNut to them. With my own music (both band and solo) we independently release our own CD's and I will put your information on the insert. If you haven't already, you should see about getting this product reviewed by the various guitar magazines. It makes way more sense than the Buzz mod, especially for those who don't want to carve up their prized axe. I wish you much success... you deserve it.
Nick
Sassano
Kings Park, NY
X_spam_Nick.Sassano@equitysettlement.com
I gave the eNut the business at the last Nitro Express gig & was pleased with how open chords on the first few positions stayed in tune, not to mention up the neck...& this is before investing in a programmable tuner. So far I'm happy to say it performs as advertised. E major sounds like it's S'POZE to, the G string no longer stands out like a sore thumb, my thumb no longer stands out like an out-of-tune G string & installation is easy as Georgia peach pie. Monte is helpful, responsive, & a SUPER nice cat to boot, so take it from ol' Buddy, you can't lose; it's one of the best modifications you can make for under $20!
Buddy
Woodward
" Buddy Woodward & the Nitro Express"
no_spam_buddy@buddywoodward.net
www.buddywoodward.net
Monte, Just did a real quickie install. Took maybe 90 seconds to slide the metal eNut into place and retune, then 20 minutes to re-intonate. I used both your suggested 2nd and 14th, but found by checking again at 5th and 17th to be even more precise. I was surprised to find your offsets different from Buzz Feiten's yet they seem to work just as well...anyway, I would like to install eNut on my other three guitars, thanks for a great improvement!
Charlie
Todd
Walnut Creek, CA
no_spam_ctodd@astound.net
Hi T-Von! I just finished wiring and shielding a new guitar that I built using your Silver Shielded Wire and Copper. The Copper you provide is very thick, not like the ultra-thin copper foil you get from the hobby shops and other places on the net. Thick, but easy to manage. The feeling of quality is there. When you shield your guitar with your copper, you feel it will last a thousand years. Plus, you can solder a ground wire to it without being anxious about burning the wood under it. Your silver wire is a delight to work with. It's obvious it's high quality coaxial wire, with a full silver inner wire already braided and a full silver shielded braid around it. Easy to use, and easy to solder. The wires literally absorb the solder. And the jacket around the wire resists the temperature of the soldering iron without melting. All the hot wires have been shielded with it inside my guitar. The result: I finished the guitar and plugged it in and I have not a hum. I mean, I really have no hum! I can now hear the breath of my amp like never before, but with no hum! I tried turning the guitar in all directions, I switched my TV on, but still no noise at all. It's a SSH model with 2 single coils too! Great!! I really recommend your products, and want to thank you for providing them.
Antoine
Carolus,
Paris, France
no_spam_mkebir@freesurf.fr
I received the Tele copper shield. Thanks for the super fast shipping. I installed it today and it completely eliminated the snap-crackle-pop that I was getting because of my unshielded pickguard. GREAT PRODUCT.. One thing that I did differently: instead of running a ground wire from the pickguard screw and soldering it to a pot per your instruction sheet, I just cut a piece of plain copper ground wire about an inch long. Then I loosened the end of the control plate closest to the pickguard and slid the wire about 1/2 inch under it and retightened the screw. Then the other 1/2 inch of wire went under the pickguard and made good contact with the copper sheet when I tightened down the pickguard screws. Works fine.
Bobby
Chandler
no_spam_bobbo71075@yahoo.com
Hello Monte, I finally finished shielding my guitar. Used copper on the main cavity, on the pickguard cavities, the lead routes, and of course the pickguard. Plus used the star ground. Wow. Silent guitar. At first I thought it wasn't working since before I put the pickguard back in, I plugged the guitar cord into the jack, just to make sure everything was working before putting the pickguard into the guitar. I didn't hear anything, and thought "oh no, I have a short." But no, I simply didn't hear any static or buzzing. Quite amazing. Thanks again, Cheers!
Richard
Boubelik
no_spam_mrboubel@gsb.uchicago.edu
Hi Monte, I received the copper shields for my Teles and my buddy's Strat. I got them about a week ago but didn't install them til yesterday. The guitars play much quieter and no more static from finger to pickguard contact. These shields are a very inexpensive and easy way to make a big improvement in the sound of your expensive guitar. I have a 72' Tele and a '52 Reissue and there is a big difference especially with the '72. My friend's '56 NOS Strat is now a very quiet guitar. Many Thanks.
Grant
Ruffle
no_spam_guitarman5000@rogers.com
Monte, I bought and installed your pickguard shield and copper shielding material for my Warmoth fretless Strat project. This was my first time putting a guitar together. The guitar is absolutely free of hum. None whatsoever. I'm currently running Carvin Ap11 single coils and have it rigged so that I can have all three pickups on at once. Even in this position, no hum. This stuff is great. Thanks a bunch.
Andrew
Call
Alfred Station, NY
no_spam_alcall@eznet.ne
I recently install Monte's copper guitar shield and silver guitar wire with amazing results! I now have a much quieter guitar with more clarity, less noise and more present harmonics. I search the web everyday trying to find new ways to improve my guitar tone and running across Monte's site was a great find. I'm a professional guitarist and I've tried just about everything out there. So take my word for it, try the copper guitar shield, and silver guitar wire...you won't be sorry.
Peace
and Blessings
Dani Robyns
no_spam_stranobelo@aol.com
Hi Monte, having used your shielding in the past on 2 other Strats I can honestly say that it is excellent, I have used it in conjunction with Fender Vintage Noiseless pickups and the results are outstanding. You can quote this in your testimonials. All the best from England.
Gary
Haigh
no_spam_g.haigh@ntlworld.com
Hey Monte! I purchased a copper sheet and silver wire from Monte for my Jazzmaster.. what a difference it has made! The humbuckers I put in now sound spectacular, even with the single-coils tapped. The clarity is where it should be. The guitar sounds better than ever! I had to rewire it after my first try, since I didn't leave one end of the silver wire shielding unconnected (using it for the ground wire). Later, I made sure that the silver wire's shield was only soldered to one side, and the circuit ground was then star-grounded with insulated wire. Do this to every one of your guitars, even if it's only for the electronics/pickup cavities. Your ears will thank you!
Peter
Urso
Los Angeles, CA.
no_spam_purso@juno.com
Monte, shield arrived in good order, fitted today - and the difference is remarkable - no discernible noise (I have tried TV remotes, dimmer switches, PC's etc - just for fun!).
Jon
Isaacs
United Kingdom
no_spam_jon@isaacs.screaming.net
Got it, finished, works great! Made a Tokai Strat a work of art. SD Custom 5 HB in the bridge, and a pair of 57/62 Fender reissues. I wired it like a JV Strat with tone control in the bridge. Lots of nice tones! Thanks for the help, I'll be posting about my success with your product! Take care, until the next project!
Joe
Janasov
Duluth, GA
no_spam_jkjana@bellsouth.net
This is my 2nd order from you. I shielded a jazz bass using your foil and shielding paint and it is approx. 75% quieter. I'm still trying to nail that other 25%. I will be happy to provide a testimonial. Any suggestions on the other 25% would be appreciated.
Thanks,
Andrew Rothstein
Woodbridge, NJ
no_spam_arothstein@ureach.com
Thanks Monty These are the best thing since Sliced Bread! Heck maybe even better than the wheel.
Peter
Siekierski
Staten Island, NY
no_spam_vsnrocks@yahoo.com
Shield received and installed and sounds incredible!!!! 10 times more shielding properties of the standard aluminum fare. I had my pickup cavities already copper shielded, and now this totally cancels out any noticeable interference. Glowing feedback has been posted. It has surely been a pleasure. Will see you around eBay. Thanks again.
Michael
McWeeney
Spring Valley, NY
no_spam_wizardcable@earthlink.net
Received
the shield I ordered just before leaving for Daytona, (I work the race
there). Took the guitar with me and did all the work in my motel room at
night. When I got home, I plugged in and was amazed at the sound I got.
I have worked on many guitars of various makes and models and your product
sure simplified things.You can expect to hear from me the next time
someone brings me a problem guitar.
Michael
Morris
no_spam_fess@epix.net
Hi Monte, I installed the Tele shield this weekend and I am delighted to report it totally eliminated the scratchy sounds I was picking up from the pickguard. I just ordered a Shield for my Strat based on the improvement your shield did for my Tele. Someday, when I have the time, I'll be sure to check out your Shielded Wiring. Thanks for Sharing!!
Mark
Cooper
Ann Arbor, MI
no_spam_mwcoop53@earthlink.net
I am very impressed with Monte's copper shields. I recently installed one in my main studio guitar, and I will be recording the rest of my guitar tracks for Zyllion's debut CD using it. It makes quite a difference.
John
Pollard
Providence, RI
no_spam_Jpollard12@aol.com
Hi
Monte,
Yes, I received your shield and finally got to install it as directed on my
'62 Tele this past weekend. It made a world of difference!! My noisy old axe
is now very quiet. The only noise to be heard is the noise the I'm makin' with
it :^) Thanks for a great product!
Jim
Gosselin
Des Moines, IA
no_spam_goslinks@mchsi.com
Hi Monte,
The shields came yesterday and in 15 minutes I installed the first one in my '83 Tele (Strat Shield looks like it will take a lot longer to install). The static noise problem I had is completely gone! Thanks very much!
Forrest
Trenholm
Weymouth, MA
no_spam_ftrenholm@attbi.com
Monte, just installed your Strat shield in my favorite Strat. I was having a problem with static noise when my fingers would scrape across the pickguard. But no more! Your shield allowed me to properly ground the pickguard and the attached components, and now there's no more noise! Thanks!!!
Peter
M. Jagielski
no_spam_peterj@insight.rr.com
Just tried out my strat after swapping in Tex-Mex pickups, a better switch, quality pots and one of your copper-shielded pickguards. I also completely shielded the pickup cavities and jack cavity with some scraps I purchased at your site. Got some self-adhesive copper tape at a stained glass supply shop and that worked really great for shielding the cavity sides. Man, this guitar is so quiet now that I can hardly believe it! What an improvement: buzz and hum are history! Definitely worth doing, Thanks.
John
Redell
USA
no_spam_Torr66@aol.com
I just put a Strat Shield on a new pickguard that I put on a Reissue 57 Strat. The tone stayed great and the output is Hotter. It Rocks...and looks pretty cool with the updated pickguard .
Bob
Smith
no_spam_bob.smith@films.nfl.com
I
received and installed the pickguard I purchased from you last week. If
you recall, I also obtained the copper shielding, which made a huge difference
in reducing (almost eliminating) noise.
Regards,
Verle Winningham
no_spam_vvvvman@chartermi.net
Michigan
Hello, I got the shield yesterday in good condition. It'll be a few weeks before I put it in, but I'll let you know how it worked. I bought one of your alum. shields a few months back. Anyway, I used it with some Lindy Fralin blues specs. and I hear no hums. So, I expect the same with this one. Thanks for the quick shipment. Left positive feedback.
Clark
Sudduth
Bay Minette, AL
Monte,
I installed the shield last night (fairly easy). Wow, what a difference!
The shield really works! Only way my Strat clone could be quieter is putting
in a set of blade type pickups like Bardens. And we know how expensive
those are plus not the same tone.
Thanks a bunch,
Joy Rathnam
T-Von, I used one on my Son's Tele before, and it did help. Your shield fit on just fine. I soldered a Ground wire braid to it and attached it to the Main ground of the Tele. I am now doing another Tele for one of my Son's friends. Like I said, "it definitely made a difference"!! I like the thickness of the shield. It is just right.
Thanks,
Philip DiEgidio
Glen Moore, PA
Olive Branch, MS 901-457-4630
|
|
||
|
|
|
|
|
|
|
|

BONE VERSION
Click on Images to Enlarge
Step 2
It’s not necessary to remove the strings. Just loosen them enough to get them out of the way. You may want to tape them out of the way using some masking tape.
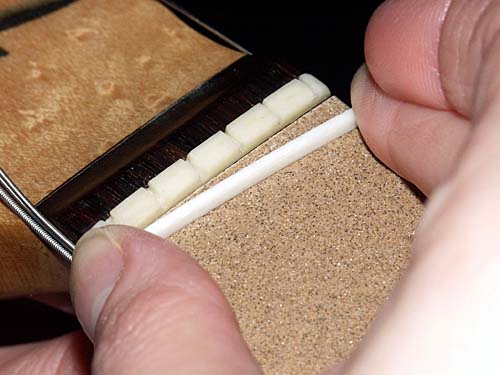
Take the eNut and check to see if the bottom radius is the same as your fretboard. If it is, you may proceed to step 4. If not, take the supplied sandpaper and place it on the fretboard wrapping it around with one hand. Now take the eNut with the other hand and sand the bottom radius until it matches the radius of you guitars fretboard. Be sure once you’re finished to remove the excess bone powder from the bottom of the eNut.
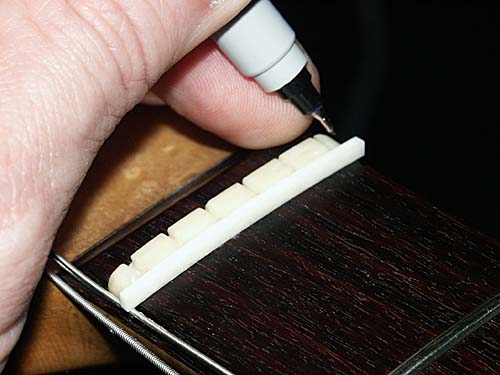
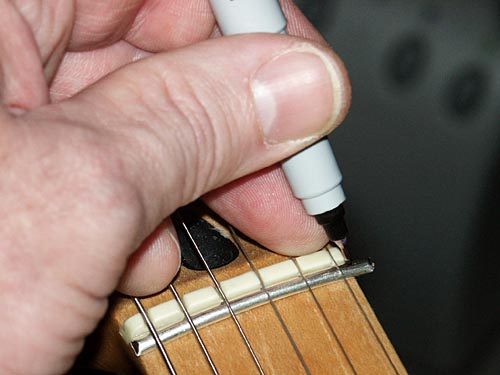
Take your marker and mark the excess on the side of the eNut that needs to be removed.
Now you have two choices. You may leave the eNut on the fretboard or remove it for sanding and shaping. It you’re afraid of damaging your guitar you may want to remove it. IMPORTANT: save the bone dust, you may need it later. You can mix it with Super Glue and use it to touch up any imperfections that may occur to the guitar nut or eNut during installation.

Step 6

Step 7
Since the eNut is already up next to the existing nut this will make cutting the string extension slots easier. Simply file the slots until the depth and width match the existing nut. IMPORTANT: Take your time with the filing of the strings slots. This is the most important step in the entire installation. File a little at a time checking your progress as you go. Place the string in the slot often checking your progress. Don't worry about getting the slots perfect during the first filing. It's better to file too little than too much. If you do accidently file too much of the eNut you can take the bone dust excess and mix with super glue and use it to add bone back to the eNut if necessary. In fact, I suggest filing the excess eNut away instead of cutting, this way you can use that dust for touching up the slots if need be.

Step 8
Once you are satisfied, go ahead and start placing the strings in the slots. Go ahead and tune to pitch on all strings. Take each string and check to make sure the notes are sounding and ringing true. Again, do not worry about perfection at this point. I like to fine tune an install over a three day period, making necessary adjustments during that period. If the slots have been properly filed there should be no alteration to your existing nut. Ocassionally I come across a nut that wasn't cut properly to begin with. In this case some original nut slot filing may be necessary to acheive the proper string to fret height at the first fret.
Final Thoughts
It’s important that the string slots be properly cut. The slots should be only wide enough to allow the string to freely move through the slot but not so wide that the string moves from side to side. I also recommend using a drop or two or lubricant in the slots to prevent binding. I like to use Liquid Wrench but any lubricant will work. Now, tune up and enjoy!
METAL VERSION
Click on Images to Enlarge
Step 2
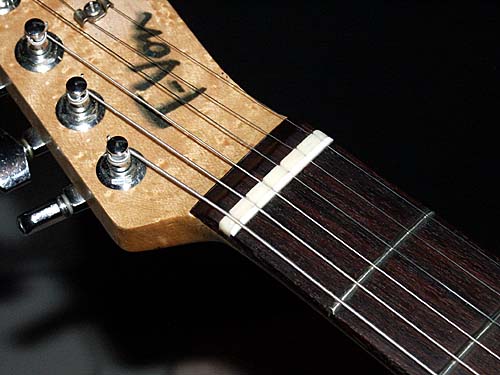
Loosen the strings and slide the eNut under the strings and up against the nut.

Step 3
Place the eNut up next to the existing nut. Do not glue it down. Now tune to pitch. This will shape the metal eNut to the radius of the fretboard.
Once the eNut has formed to the radius of the fretboard take your felt tip marker and mark the excess eNut to be removed.
Now remove the eNut and trim the excess with your wire cutters.


When finished place the eNut back under the strings and against the nut.
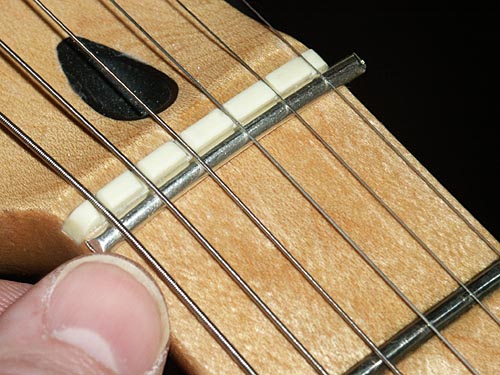
Now check the distance from the bottom of the strings to the top of the first fret.

Your target height should be just a tad more than the distance from the bottom of the string to the top of the second fret when the first fret is depressed as is illustrated in the pic below.

If the string to fret height is too great you will need to remove the eNut and using a flat file carefully shave down the top of the eNut. Repeat this process until the desired string to fret height is achieved. NOTE: I have installed several Silver and Brass eNuts without any alteration to the original nut by simply slotting the eNut. This is the way I install the Bone version. Simply use the supplied Exacto Blade or file to make the slots for each string. The slots will need to be a tad higher than the original nut.
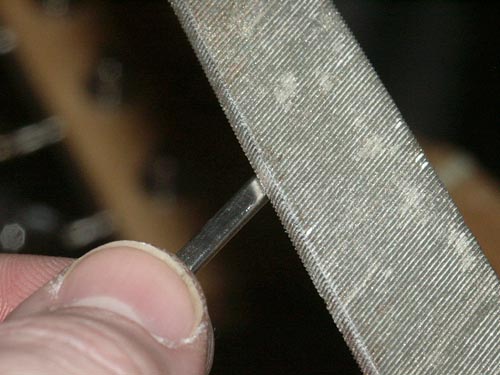
IMPORTANT: Do not shave the excess metal off of the bottom of the eNut, shave it off the top only. It’s important that the bottom surface be smooth and contacts the fretboard in a secure manor. If the eNut’s contact is obstructed it could cause your open string notes to buzz.

When
finished filing, the eNut should look similar to the pic above.
Step 5

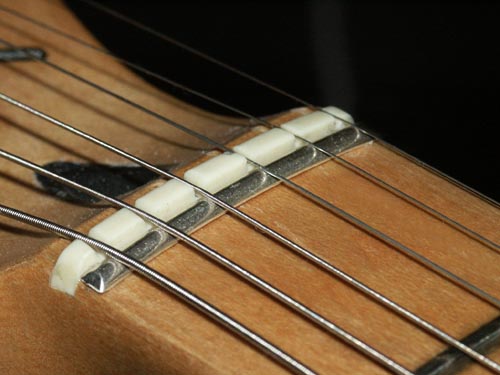
Once the desired string to fret height has been achieved place the eNut back onto the guitar. At this point your nut string slots are probably going to need to be deepened. With the strings tuned to pitch strike each string to see if the notes are ringing true and clear. If there is fret buzz those strings nut slots will need to be deepened. With the strings still at pitch slide the eNut away from the nut as pictured above.

Now one at a time lift the string from the nut slots and off to the side. Take the exacto saw blade supplied with the eNut and deepen the nut slots one at a time. File a little, place the string back into the nut slot and check that the note rings clear. Repeat until all notes ring true without any buzz.
NOTE: I've started putting slots (notches) in the metal eNuts to hold the strings stationary during chokes and string bending. If the nut slots are cut too wide the strings will slide from side to side during string bends. By putting slots (notches) in the metal eNut it will hold the strings in place. I've also found that putting slots (notches) helps in adjusting individual string to fret height at the first fret.
It’s important that the string slots be properly cut. The slots should be only wide enough to allow the string to freely move through the slot but not so wide that the string moves from side to side. I also recommend using a drop or two or lubricant in the slots to prevent binding. I like to use Liquid Wrench but any lubricant will work.
I like to do the initial install and tweak to perfection as time goes on. So if you don't get it perfect the first setting don't sweat it. Play the guitar a few times and make slight adjustments until you get the string slots and string height at the eNut exactly like you want it. TIP: Save your nut dust. If you make a mistake you can mix it with some super glue and reapply it to the nut.
I also like to finish off an installation by polishing the metal eNut with a Dremel Tool, polishing compound and polishing attachment. It just adds to the aesthetic of your guitar. Now, tune up and enjoy!
Wire Cutters - This is needed to trim the metal eNut. Not needed with the Bone version.
Fine Sharpie Marker - This will be used to mark the eNut for slotting and trimming.
Also, tune the guitar in the playing position. If you are going to be sitting on a stool when playing tune your instrument while sitting. If you are going to be standing using a strap then tune your guitar while standing. Here’s why; how you hold your guitar places different amounts of tension on the strings. When you sit there’s less tension than when you stand. I know this sounds anal to some but a couple of cents this way or that way can be the difference between a guitar that plays in tune and one that doesn’t. Most musicians, even those with perfect pitch, can only hear pitch differences “+” or “-” 2 cents. But a cent here and a cent there can mean the difference between whether the harmonics and overtones ring in a pleasing way or with dissonance.
TUNING, SETUP & PLAYING TECHNIQUE TIPS
A properly setup instrument CAN be made to play in tune. The eNut along with my Custom Tempered Tuning Offsets will give you tuning accuracy that no other system, no mater what the cost, can give you. But, the ETS is only part of the tuning equation. Things like proper playing technique, proper string to pickup height, properly leveled and crowned frets, neck relief and proper tuning technique are paramount. The eNut is a vital part, but alone it is not enough. In the following paragraphs I will cover some of the finer aspects of playing and tuning techniques.
I realize there are different levels of player expertise that will be purchasing the ETS so I'll try and cover all the bases. Some of you play professionally and some are weekend warriors. But I also realize there are pros that don't do their own setups or fretwork and then there are semi-pro players and some beginners that are doing their own setups, fretwork and electronics. My target is to try and cover the entire gamut.
I recommend those that are not doing their own setups find a good reliable luthier in your area. Let's start with playing technique. It's important that when fretting a note or a group of notes that equal pressure be applied. Not too much and not too little. Too much and the note will play sharp. Too little and the note will buzz. When chording always try and fret the notes without pushing or pulling the strings. Hit the notes from the top and press straight down concentrating on not moving the note. And only with enough pressure to sound the note or notes clearly. Most of these tips pertain to chords. When riffing and playing leed vibrato riffs also play close attention to how you phrase the notes. If you are soloing single non-vibrato notes, hit them straight on concentrating on not pushing or pulling them.
Your frets should be level, crowned and polished. There's nothing worse as a player than to play an instrument that is difficult to play. Maybe the action is too high or the frets are tarnished and gritty. Even if you don't know how to level and crown your frets you can learn to polish them. I recommend a Dremel Tool, small polishing tip (buy on Amazon by clicking here) and some of their polishing compound. Buy yourself a fret protector from Amazon by clicking here and polish those frets. It's worth the time and cost. It will enhance the playing experience and lengthen string life.
NECK RELIEF - Ideally I like very little neck relief. The easiest way to check a guitars relief is to hold the guitar up toward a light source and look straight down the neck from the bridge end. There should be a very slight curve that arcs down when the top of the guitar is in the up position. Typically a guitar with properly leveled and crowned frets will allow less relief without fret buzz than one that has frets that are not level. You can usually stop certain types of fret buzz by increasing the amount of relief. Doing so will raise the action around the 7th and 9th fret areas. It's best to have the frets leveled and crowned periodically. How often depends on playing style, fret type and the amount of playing time that particular instrument gets. Small divots are usually okay but as they wear deeper fret buzz will occur. When this happens that area of the fretboard must be leveled, crowned and polished.
PICKUP HEIGHT - Pickup height plays a part in overall intonation. More so than one would think. Most set their pickups too high. If a pickups magnet is too close to a string the magnetic pull will cause something called "Stratitis". The affect can be described as a warbling type effect when a note is sounded. Intonation is impossible to set when this occurs. Usually the warbling type effect is most pronounced in the higher notes around the 12th fret area. When setting the saddles during intonation with a strobe the affect will prevent the fretted note from accurately representing the note. Thus saddle positioning becomes an impossibility. On Strat type single coils I like at least 1/8" from the top of the highest pole piece to the top of the strings when the 12th fret note is fretted. Humbuckers have a little less magnetic pull so I usually set them to 3/32" to 1/16".