`

Olive Branch, MS 901-457-4630


CLICK ON THESE LINKS TO GO TO ITEM

CHIP DESCRIPTIONS

JRC4558D – Made by Japan Radio Corporation (JRC). Used in the original TS808s and TS9s. Ibanez later changed the chip used in their pedals. The JRC4558D is actually a very inexpensive chip that’s not considered Hi-Fi and was chosen because of its inexpensive cost and not for the tone it produced. It just happened to sound great when used with the Tube Screamers original circuitry. This chip has a little bit smoother gain than the RC4558P which is considered a more Hi-Fi chip. I like the JRC4558D in the SD-1, it's smoother gain in the top end helps to offset the extra hair in the SD-1's gain. I prefer the RC4558P in a Tube Screamer because the Tube Screamer circuit produces a smoother gain and the RC4558P has a little more high end grit than a JRC4558D.

JRC4558DD – Made by Japan Radio Corporation (JRC). This is a Higher Gain & Smoother version of the JRC4558D (notice one has one "D" and the other two "DD"s). It's less Hi-Fi and has a smoother gain structure with a slight rounding off in the highs. This "DD" chip sounds surprisingly good in an SD-1. This is the stock chip you'll find in most SD-1s and TS7s. This is a good match for my SD-808. Try it and I think you'll agree. My SD-808 has clearer top end and more hair. The JRC4558DD tames the SD-808 a bit in the highs. Depending on your amp you might like this chip better. I have a few of these. Contact me if you want one, I don't have these listed for sell on my pedal mods page because most people write them off as being a bad chip. But, who cares what others say, the proof is in the tone and I say they sound great with some SD-1 setups. Of course, YMMV.

RC4558P – Made by Texas Instruments. Also used in the original TS808s and TS9s. Ibanez later changed the chip used in their pedals. The RC4558P is also a very inexpensive chip but considered to be a bit more Hi-Fi than the JRC4558D. It just happened to sound great when used in a Tube Screamer circuit. These are still very popular today and are a great sounding chip. Very similar tone-wise to the JRC4558D, has a little more high end grit.

RC4559P – Made by Texas Instruments. This is a more Hi-Fi lower noise chip than it's brother the RC4558P. The EQ and gain structure is a bit different than the RC4558P. I like this chip because of it's lower noise when used in a GE-7. I also like this chip in a SD-1 and Tube Screamer circuits. This chip changes the EQ of the gain and helps tame the mids in a Tube Screamer.

LP353 - Made by Texas Instruments. Very similar tone-wise to the JRC4558D and RC4558P. Maybe a little less gain but an excellent sounding chip. Subtle differences. This chip sounds excellent in a Tube Screamer, Daddy-O or SD-1. This is a very popular chip with pedal modders.

NE5532 - Made by Texas Instruments. Very similar tone-wise to the JRC4558D and RC4558P. This is a more Hi-Fi, lower noise chip than both the JRC4558D and the RC4558P. I really like the tone and gain of this chip. In some ways I like it better than a JRC4558D or RC4558P. Rich, smooth gain with nice overtones. This is a very popular chip with pedal modders.

TL072 - Made by Texas Instruments. Very similar tone-wise to the JRC4558D and RC4558P. This chip has a very interesting tone. A little more complex than any of the other chips I sell. Very defined harmonics, especially at higher volume. This chip is very Hi-Fi with low noise and a great sounding gain structure.

OPA2134PA – Made by Burr Brown. This is the most expensive opamp chip I sell. This is a very popular chip with audiophiles. It’s low noise and excellent sound properties make it a popular choice with pedal modders. I especially like this chip in a Boss SD-1. It has a little more edge than a JRC4558D or RC4558P and is a tad cleaner with a flatter EQ which makes it a great chip to tame the mids of a Tube Screamer or SD-1. Very rich and defined gain with excellent harmonics and note detail. You can’t go wrong with this chip. Highly recommended.

LM308N Ð Made by National Semiconductor. If you want that Vintage RAT tone that made the RAT one of the most popular distortion pedals of all time then you'll need to replace the stock raspy sounding OPO7DP. The LM308N will give the circuit a very warm and smooth fat gain structure.
DISCLAIMER - Building pedal mods can be a very challenging task. Trying to create mods and shape a pedals tone is not easy. When you take into consideration the wide variety of guitars, pickups, amps, speakers, etc. it becomes a challenge trying to develop mods that will satisfy every players particular needs. I test all my mods with a variety of tube and solid state amps and I won't release a mod until they sound right on each of them. But, please realize it's just impossible to match one mod to every amp and guitar combination. This is why I suggest everyone listen closely to the mp3s I supply and pick a mod that you feel will suit your particular setup. This is why I tell you what each mod does so you can shape your tone for that pedal. If you're a member of a guitar or effects forum ask other members that have purchased my mods which setup they use and which mod they suggest for a particular tone you are looking for. Monte Allums

Daddy-O TNT Mod - I really didn't hold much hope for this one. Sounded really fizzy and ratty stock. The LED clippers added way too much bass and fizz in the gain on the stock pedal. After the mod notes will literally explode off the neck of the guitar. Next to my SD-808 mod this is my favorite modded pedal for mid to higher gain tones. Here are my recommended settings for this pedal after the mod.

Volume - 11 O'clock.......Bass - 5 O'clock.......Mids - 5 O'clock.......Treble - 10 O'clock.......Drive - 2 O'clock

At these settings you can use the guitars volume to control the amount of drive. If you're looking for a powerful punchy tone this is it. This mod sounds great with every tube and solid state amp I used it with. This is not a good mod for someone looking for a clean boost. But if you're looking for a take no prisoners overdrive that is explosive, this is the perfect pedal mod for you.

Daddy-O TNT Tri-Gain Mod - The Tri-Gain switch will add 2 extra gains to the TNT. The LED side has less gain and is more coarse but is also fatter and thicker. Through a clean or slightly over-driven solid state or tube amp it is one of the most explosive punchy and crunchy mods I offer. Do yourself a favor and add the Tri-Gain switch if you have the regular TNT. You can thank me later.

Diode Lift - Good Crunchy Boost - Volume - 2 O'clock.......Bass - 5 O'clock.......Mids - 5 O'clock.......Treble - 10 O'clock.......Drive - 7 O'clock

LED Side - Marshall Crunch - Volume - 9 O'clock.......Bass - 5 O'clock.......Mids - 5 O'clock.......Treble - 10 O'clock.......Drive - 3 O'clock

Diode Lift has the most volume followed by the LED side and the lowest volume will be the 1N4002 side. TIP: Try a JRC3458DD in this pedal. It's my favorite chip. Very smooth creamy vibe.

TIP: The Tri-Gain and Dual Gain switches add volume and the levels are different depending on the components selected. This can be an issue if you need your setup to maintain a certain volume level. By placing a compressor after the gain pedals you can tame the volume and still enjoy the benefits of the different gain setting the switches give you. The compressor will act as a limiter and even out the volume differences. The effect is also very cool. Try it and I think you'll agree.


MXR Dyna Comp DIY Pedal Mod - I love the rubbery sponginess of this compressor after the mod. This is a chicken-pickers dream. The mod takes away the clanky distortion that's present in the stock pedal and smoothes out the attack of the compression. If you're looking for compression with attitude this is it. I suggest adjusting the internal attack pot to taste to match your playing style. Keep in mind that the attack trim pot has a limited range. Turning too far left or right will negatively affect the tone of the pedal. Adjust to the right for more attack and left for less. Here are my recommended settings for this pedal after the mod.

Output - 3 O'clock.......Attack Pot - 2 O'clock.......Sensitivity - 4 O'clock

For more pick attack try moving the attack pot further right. For a more transparent tone try the Sensitivity at 12 O'clock or less. Adjust output to desired level for matching level or clean boost. This is not for someone looking for a transparent compression. For transparent compression I suggest my CS3 mod. For compression with fattening and color this is the mod I suggest.

TIP: The Tri-Gain and Dual Gain switches add volume and the levels are different depending on the components selected. This can be an issue if you need your setup to maintain a certain volume level. By placing a compressor after the gain pedals you can tame the volume and still enjoy the benefits of the different gain setting the switches give you. The compressor will act as a limiter and even out the volume differences. The effect is also very cool. Try it and I think you'll agree.


Tube Screamer DIY Pedal Mods - For a smooth round clean boost or smooth thick overdrive or for a tad of drive to boost that tube amp into tonal bliss this is the mod for you. For a tad fatter EQ with less mid hump I suggest using the Burr Brown chip with this mod. Here are my recommended settings for this pedal after the mod.

SMOOTH THICK OVERDRIVE - Drive - 2 O'clock.......Tone - 12 O'clock.......Level - 2 O'clock

CLEAN BOOST - Drive - 8 O'clock.......Tone - 2 O'clock.......Level - 5 O'clock

Adjust the drive to taste for these settings. Tone adjustment will also need to be adjusted for your particular setup. These settings will also apply for the TS9, TS7, TS5, and TS9DX. NOTE: I use a Tube Screamer when recording Bass here in my studio. It helps to add a thick fullness that helps the tracks stand out in a mix. When using it for recording try the Clean Boost setting above and adjust the drive to taste. I also recommend trying a Tube Screamer for Bass in a live setup. It's just a great effect for thickening the signal and making it stand out in a mix, live or recorded.

TS9 Tri-Gain Mod - The Tri-Gain switch will add 2 extra gains to the TS9. The LED side has less gain and is more coarse but is also fatter and thicker. This might be the best overdrive available anywhere. Think Landgraff and Eternity here. It puts the TS9 in that territory. The presence switch on the bright side with the diode lift or LED side and the drive at 12 O'clock or less and the tone down around 7 O'clock gives the most incredible fat rich tone with this heavenly clarity that you'll find in any pedal at any price point. No hype folks, this is a smokin mod.

Diode Lift, Presence Switch On - Good Clean Boost - Drive - 7 O'clock.......Tone - 7 O'clock.......Level - 2 O'clock

LED Side, Presence Switch Off - Marshall Crunch - Drive - 3 O'clock.......Tone - 10 O'clock.......Level - 10 O'clock

1N914 Side, Presence Switch Off - Blues Heaven- Drive - 9 O'clock.......Tone - 10 O'clock.......Level - 3 O'clock

Diode Lift has the most volume followed by the LED side and the lowest volume will be the 1N914 side. TIP: Experiment with the Presence switch On and the Tri-Gain switch to the LED or Diode Lift side. You'll need to turn the tone knob down but the smooth fat silky tone drips with fat sassy tone. No joke, I have played a Strat for hours basking in the tones I get from my HRD. The HRD is sort of a dark amp tone-wise and the brightness of the TS9 Tri-Gain is a match made in tone Heaver! NOTE: Some have e-mailed me about excess noise this mod produces. First, anytime you add a presence mod to a pedal you boost the high frequencies thus boosting noise. In other words, your amplifying noise that is already in the circuit. I'm afraid there's nothing I or you can do about it. Just go easy on the tone knob.

TIP: The Tri-Gain and Dual Gain switches add volume and the levels are different depending on the components selected. This can be an issue if you need your setup to maintain a certain volume level. By placing a compressor after the gain pedals you can tame the volume and still enjoy the benefits of the different gain setting the switches give you. The compressor will act as a limiter and even out the volume differences. The effect is also very cool. Try it and I think you'll agree.

BD-H2O & Regular BD-2 DIY Pedal Mods - If you are looking for a transparent clean boost and one that will react exactly like the breakup of a driven tube amp this is the pedal mod for you. Both my regular BD-2 mod and the popular BD-H2O are perfect for these applications. The main difference between my regular BD-2 and the H2O is the gain and the EQ of the pedal after the mod. My regular BD-2 mod has a slight mid boost and a more fuzzy-type gain structure. The H2O is totally flat in the EQ and has a more smooth and dynamic gain structure. When trying to pick one over the other I suggest listening to the mp3s, they are very true to the result of the mod.

SMOOTH OVERDRIVE - Level - 11 O'clock.......Tone - 11 O'clock.......Drives - 1 O'clock

CLEAN BOOST - Level - 2 O'clock.......Tone - 12 O'clock.......Drives - 7 O'clock

Adjust the drive to taste for these settings. Tone will also need to be adjusted for your particular setup. The transparency and dynamics of these mods are pretty amazing. The ariness in the top end on the H2O is spectacular, the best available on anyone's mod for the BD-2. The harshness is completely removed on both mods.

TIP: The Tri-Gain and Dual Gain switches add volume and the levels are different depending on the components selected. This can be an issue if you need your setup to maintain a certain volume level. By placing a compressor after the gain pedals you can tame the volume and still enjoy the benefits of the different gain setting the switches give you. The compressor will act as a limiter and even out the volume differences. The effect is also very cool. Try it and I think you'll agree.

SD-808 & Regular SD-1 DIY Pedal Mods - For a smooth, round, clean boost or thick overdrive like a Plexi Marshall or for a tad of hair to boost that tube amp into tonal bliss this is the mod for you. For a tad fatter EQ with less noise I suggest using the Burr Brown chip with this mod. Here are my recommended settings for this pedal after the mod.

SMOOTH THICK OVERDRIVE - Level - 11 O'clock.......Tone - 12 O'clock.......Drive - 2 O'clock

CLEAN BOOST - Level - 2 O'clock.......Tone - 1 O'clock.......Drive - 7 O'clock

Adjust the drive to taste for these settings. Tone will also need to be adjusted for your particular setup. For a smoother over drive I suggest my regular SD-1 mod. For a more Hi-Fi sounding pedal with enhanced note clarity the SD-808 is the ticket. For clean boost applications I recommend the Burr Brown chip and I also recommend not doing the 2X gain mod. I also suggest the symmetrical mod for those looking for a smoother over drive like found in the Tube Screamer. Also, try the JRC4558DD in the SD-808. This chip is a bit smoother and can tame the grit of this mod a bit.

SD-1 GT Mod - For a smooth, round, clean boost or thick overdrive like a Plexi Marshall or for a tad of hair to boost that tube amp into tonal bliss this is the mod for you. For a tad fatter EQ with less noise I suggest using the Burr Brown chip with this mod. Here are my recommended settings for this pedal after the mod.

Sym Gain, Presence Switch On - Very Articulate Boost - Drive - 2 O'clock.......Tone - 10 O'clock.......Level - 11 O'clock

Asym Gain, Presence Switch Off - Nails a TS808 - Drive - 11 O'clock.......Tone - 10 O'clock.......Level - 2 O'clock

Sym Gain, Presence Switch On - Think Plexi - Drive - 2 O'clock.......Tone - 9 O'clock.......Level - 1 O'clock

The tones available with this mod are endless. Two of these used together is a force to be rekoned with. NOTE: Some have e-mailed me about excess noise this mod produces. First, anytime you add a presence mod to a pedal you boost the high frequencies thus boosting noise. In other words, you're amplifying noise that is already in the circuit. I'm afraid there's nothing I or you can do about it. Just go easy on the tone knob.

Regular DS-1 DIY Pedal Mods - For an all out distortion with the character of a Marshall amp this is the mod I suggest. The spiky, raspy highs and gain of the stock DS-1 are removed and replaced with a very smooth FAT harmonically rich distortion. If you're looking for an over drive this is not the mod for you. For a thick take no prisoners distortion this is the ticket. Here are my recommended settings for this pedal after the mod.

SMOOTH THICK distortion - Tone - 10 O'clock.......Level - 3 O'clock.......Distortion - 2 O'clock

Adjust the drive to taste for these settings. Tone will also need to be adjusted for your particular setup. My regular DS-1 mod is very different than my Rectifier mod. It has overall less volume and the gain structure is not as scooped as my Rectifier mod. I suggest listening to the mp3s for a more accurate representation of the mod. They are very true to the tone of the modded pedals.

DS-1 Rectifier DIY Pedal Mods - My Rectifier DS-1 mod offers a little more variety of tone than my regular DS-1 mod. After the Rectifier mod the tone and distortion knobs become very interactive rendering a wide variety of tones. You can easily go from smooth over drive-type distortion to thick sassy distortion with this mod. This mod has a scooped EQ for you metal heads but can also achieve an almost over drive-type distortion for you rockers. This is a very versatile pedal after the mod. Here are my recommended settings for this pedal after the mod.

SMOOTH THICK Overdrive-Type distortion - Tone - 8 O'clock.......Level - 2 O'clock.......Distortion - 9 O'clock

SMOOTH THICK Scooped distortion - Tone - 11 O'clock.......Level - 12 O'clock.......Distortion - 3 O'clock

Adjust the drive to taste for these settings. Tone will also need to be adjusted for your particular setup. My regular DS-1 mod is very different than my Rectifier mod. It has overall less volume and the gain structure is not as scooped as my Rectifier mod. I suggest listening to the mp3s for a more accurate representation of the mod. They are very true to the tone of the modded pedals.

Rectifier Tri-Gain Mod - The Tri-Gain switch will add 2 extra gains to the DS1. The LED side has less gain, more volume and is more coarse but is also fatter and thicker. The diode lift gives you a huge volume boost and is a recipe for crunch heaven. The 1N4002 side and the least volume and gives you the gain of the regular Rectifer mod. This is one the best distortion/overdrive mods available anywhere. This is my best selling Tri-Gain mod that I sell.

Diode Lift - Crunch Heaven - Drive - 9 O'clock.......Tone - 11 O'clock.......Level - 9 O'clock

LED Side - Marshall Crunch - Drive - 3 O'clock.......Tone - 10 O'clock.......Level - 11 O'clock

Diode Side - Satriani - Drive - 4 O'clock.......Tone - 11 O'clock.......Level - 2 O'clock

Diode Lift has the most volume followed by the LED side and the lowest volume will be the 1N4002 side. The Tone and Distortion knobs become very interactive after this mod. With the Tri-Gain mod the DS1 becomes not only a great distortion but can also do clean boost as well as overdrive. The LED side is just pure tonal bliss. FAT, thick gain that takes on this spongy vibe that will rock your world. This blows the doors off any other DS1 mod available and if you don't think so I'll refund your money no questions asked!

TIP: The Tri-Gain and Dual Gain switches add volume and the levels are different depending on the components selected. This can be an issue if you need your setup to maintain a certain volume level. By placing a compressor after the gain pedals you can tame the volume and still enjoy the benefits of the different gain setting the switches give you. The compressor will act as a limiter and even out the volume differences. The effect is also very cool. Try it and I think you'll agree.

CS-3 Regular & Opto DIY Pedal Mods - The only difference between my regular CS-3 mod and my Opto mod is a very slight fattening of the signal you'll get with the Opto mod. Other than that they are both sonically the same. This is the most transparent compressor after the mod that I have ever played. Absolutely amazing sustain with very little noise, even with the attack and sustain pushed. The Opto gives you this amazingly FAT and transparent compression that will thicken both clean and over driven tones. I even use the Opto mod for recording vocals and keyboards here in my studio. Keep in mind that if you want to use it for recording vocals you'll need a Direct Box to convert the balanced mic signal. Run the unbalanced output from the Direct Box into the input of the CS3. Here are my recommended settings for this pedal after the mod.

CLEAN SMOOTH FAT Compression - Level - 12 O'clock.......Tone - 12 O'clock.......Attack - 12 O'clock.......Sustain - 12 O'clock

CLEAN SMOOTH FAT SUSTAIN - Level - 9 O'clock.......Tone - 11 O'clock.......Attack - 2 O'clock.......Sustain - 3 O'clock

Adjust the sustain and attack to taste for these settings. Tone will also need to be adjusted for your particular setup. I'm still amazed at just how good the CS-3 sounds after these mods. The murky mids and tone sucking noise of the stock pedal are removed and replaced with the most amazing transparent FAT compression that you'll only hear in compressors costing 2 to 3X as much!

TIP: The Tri-Gain and Dual Gain switches add volume and the levels are different depending on the components selected. This can be an issue if you need your setup to maintain a certain volume level. By placing a compressor after the gain pedals you can tame the volume and still enjoy the benefits of the different gain setting the switches give you. The compressor will act as a limiter and even out the volume differences. The effect is also very cool. Try it and I think you'll agree.

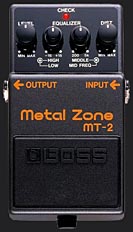
Regular & MT-2 Sustainia DIY Pedal Mods - Both of my MT-2 mods cover a lot of tonal territory. You have the option to remove the nasal mids. There are two capacitors you remove in both mods that will flatten the EQ. DO NOT REMOVE them if you want to keep the scooped mids. If you are into Metal I recommend not removing these two capacitors. These are Mods (A) & (B) of both the regular MT-2 and Sustainia mods. Also, my Sustainia mod gives you the option of transforming the MT-2 into an almost over drive-type pedal. Or you can add the two 1N34As for a thicker saturated gain. Or you can add a switch to toggle back and forth between the two (this switch is not included in the Sustainia mod). For those that are having Chad Matthews do the mod for you, you can have Chad add the switch for an additional charge. Contact Chad for prices by clicking here.

FAT & SASSY - Level - 10 O'clock.......Hi Low EQ - 12 O'clock.......Mid EQ - 12 O'clock.......Distortion - 2 O'clock

OVER DRIVE (SUSTAINIA) - Level - 3 O'clock.......Hi Low EQ - 12 O'clock.......Mid EQ - 12 O'clock.......Distortion - 10 O'clock

There's a ton of tones available here. The sweepable EQ knobs will give you a wide variety of distortion and gain. I keep all the tone knobs at 12 O'clock and adjust the level and distortion to taste. But, keep in mind I'm a praise and worship, contemporary rock type player. For other genres I would suggest experimenting with removing mods (A) & (B) in each of the regular and Sustainia mods. Leaving those caps in will render a more metal type distortion. But, you be the judge. Test the pedal for a while with different mods. You may find that leaving out one or more mods will better suit your playing style. This is the case with all the mods I sell. You don't have to do them all. Test the pedal with and without certain mods. You may discover you like the pedal better buy picking and choosing.

TIP: The Tri-Gain and Dual Gain switches add volume and the levels are different depending on the components selected. This can be an issue if you need your setup to maintain a certain volume level. By placing a compressor after the gain pedals you can tame the volume and still enjoy the benefits of the different gain setting the switches give you. The compressor will act as a limiter and even out the volume differences. The effect is also very cool. Try it and I think you'll agree.

OD-3 DIY Pedal Mods - I opted to not radically change the OD-3. In all honesty the pedal sounds great right out of the box. What I have done is remove the flabby bass that exists in the gain structure. I have also smoothed out the gain. After the mod the OD-3 will sound very similar to one of my modded BD-2s. The transparency of the OD-3 is retained and the EQ is flattened a bit. Think of what you would get if my BD-H2O and TS9 mods had a baby, her name would be Supra! Here are my recommended settings for this pedal after the mod.

SMOOTH THICK OVERDRIVE - Level - 10 O'clock.......Tone - 10 O'clock.......Drive - 1 O'clock

CLEAN BOOST - Level - 3 O'clock.......Tone - 12 O'clock.......Drive - 7 O'clock

Adjust the drive and tone to taste for these settings. The variety of tones available are pretty amazing with this mod. For transparent clean boost and thick fat drive this is the pedal mod for you. No longer will the bass become flabby at high gain setting. This mod firms up the bass and mids and evens out the gain.

TIP: The Tri-Gain and Dual Gain switches add volume and the levels are different depending on the components selected. This can be an issue if you need your setup to maintain a certain volume level. By placing a compressor after the gain pedals you can tame the volume and still enjoy the benefits of the different gain setting the switches give you. The compressor will act as a limiter and even out the volume differences. The effect is also very cool. Try it and I think you'll agree.

RECOMMENDED PEDAL SIGNAL CHAIN

Below is my recommended pedal arrangement for all the pedals we offer mods for. I do encourage experimentation, but this is the signal chain pedal placement I personally use and recommend.


Compressor (CS3 or Dyna Comp)

Wah Pedal

Volume Pedal

GE-7 (optional)

BD-2 (regular & BD-H2O)

Tube Screamer (TS9 Tri-Gain, TS9, TS7, TS5, TS9DX)

OD-3

SD-1 (regular & SD-808)

DS-1 (regular & Rectifier)

Daddy-O

RAT 2

MT-2 (regular & Sustainia)

GE7

Modulation Effects

Delay


For more tonal variety I suggest using two modded GE7 EQs. One to shape the tone prior to over drive and distortion and one after them. The advantage is that the boost and cut of the signal level that both will give you. Remember, the signal level affects the way the signal is clipped going into a distortion or over drive. By varying the signal and frequency levels you can shape the gain and tone of your signal.

TIP: The Tri-Gain and Dual Gain switches add volume and the levels are different depending on the components selected. This can be an issue if you need your setup to maintain a certain volume level. By placing a compressor after the gain pedals you can tame the volume and still enjoy the benefits of the different gain setting the switches give you. The compressor will act as a limiter and even out the volume differences. The effect is also very cool. Try it and I think you'll agree.

Also, keep in mind that if your amp has an effects loop you can insert a compressor, EQ, delay or modulation effect there. I run a stereo setup here in my studio with a Line 6 DL4 being the last effect in my signal chain. Since the DL4 is stereo out I run both outputs into my 1975 Fender Super Reverb and my 2000 Fender Hot Rod Deluxe. These are only suggestions. What works for me may not be what works best for you. But, this will give you a good starting point. Remember, the most important part of the signal chain is YOU! Effects are great fun and are only limited by your imagination!

DISCLAIMER - My Mods are intended to be used by individuals that are 18 years of age or older unless accompanied by a supervising parent or guardian. Soldering Guns can cause serious injury if not used properly. Always take the proper precautions when soldering. Always unplug power from the pedal when performing these modifications. We cannot be held responsible if you hurt yourself, hurt someone else or destroy property. When purchasing our mods you agree to comply with this disclaimer statement and fully realize any risks that may be involved with performing any of our modifications.

Please also know that we cannot be held responsible if you ruin your pedal. These mods have proven to work for hundreds of our satisfied clients. If you follow the instructions we send you to the letter and check the pedal after each component change you will not ruin your pedal.

Boss®, Ibanez®, Dan Electro®, Fender®, Strat®, Stratocaster®, Tele®, Telecaster®, Dunlop® and Peterson® are registered trademarks of their respective companies. All rights reserved. monteallums.com, LLC has no affiliation with any of these companies.


TVON'S RECOMMENDED PEDAL SETTINGS